7&8/52 Honey Sage Bourbon Cocktail & Candied Ginger Chocolate Chunk Cookies

fullsizeoutput_2b2a
Not a meal. Not saying it couldn’t be. There’s fruit in it.

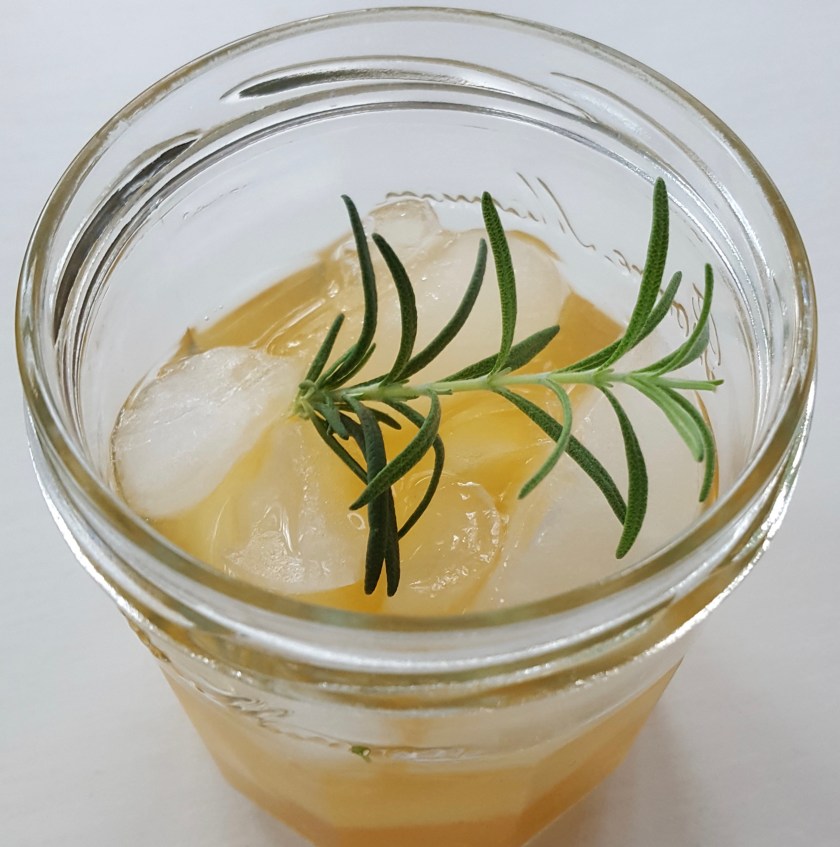
Susie Homemaker I am not. I’m not particularly tidy. I avoid cleaning, which means I let things go until crisis point (eating off orphaned plastic container lids and going sockless) or we have company arriving. I enjoy cooking and baking, but cuisine is one of the first priorities to go when adulting gets to be overwhelming. Any military wife will tell you that popcorn or cereal can be a meal (ANY meal) during deployment or any other service member absence (it’s never JUST a deployment). I like to think I have perfected the art of lazy feeding when my husband is gone and the three of us (plus dog) are left to our own devices. My crowning achievement was the invention of “Big Bowl of Food”, where, writhing in the throes of a back injury, I desperately assembled a lunch of snack items (crackers, raisins, nuts, Cheerios, fruit snacks?, pretzels) in a – you guessed it – big bowl and plopped it on the coffee table with two cups of milk and let the boys have at it. It’s become one of my most requested creations.

In fourteen days, this house has seen three injuries above the neck (all on the same kid, looking into having him fitted for a helmet), three days of fever (other kid), and mild flu-like symptoms (Mommy). Only the dog remains unscathed. Meals these past two weeks have been of the lazy variety. Store-bought rotisserie chicken with noodles and steam-in-the-bag broccoli for three nights, a standby meatball recipe that lasted until no one ever wants to see a meatball again (especially Meatball, who doesn’t care for them in the first place), and teriyaki chicken have pretty much seen us through, augmented with a couple of trips through the Chik-fil-A drive-thru. *Bonus recipe for teriyaki chicken: Pour one bottle Soy Vey Teriyaki sauce into slow cooker. Add 4-5 skinless chicken thighs (boned or not, doesn’t matter), cook on low for 4 hours. Serve with rice.* I’m patting myself on the back for not resorting to Big Bowl of Food and celebrating with the cocktail I had wanted to make when I did the Maple Bourbon Rosemary Cocktail.

Honey Sage Winter Bourbon Cocktail

As usual, my edits are in bold.

Honey Winter Bourbon Cocktail with Honey Sage Syrup No need to say honey twice here, honey. Winter Bourbon Cocktail with Honey Sage Syrup or Honey Sage Winter Bourbon Cocktail.

Honey Sage Syrup I halved this recipe knowing I barely had enough Bourbon for one cocktail

  • 1 cup water
  • 1/2 cup honey
  • 10-12 Fresh Sage Leaves

Cocktail

  • 2 ounces Bourbon Normally, I prefer Buffalo Trace for cocktails but it is extraordinarily difficult to find in Southern Maryland. I found it ONCE in our local booze-selling grocery but had just bought some Makers Mark and couldn’t bring myself to buy more Bourbon and now I’m kicking myself. 
  • 1 orange peel
  • 1 fresh sage leaf
  • 3 Tbsp honey sage syrup
  • Servings: 3 Nope. Three teetotaling 85 pound gymnasts, maybe, but these quantities make ONE decent drink. 

Instructions

Bring the water, honey, and sage to a boil in a pot over medium high heat. Reduce to
lowand simmer 3 minutes. Turn off heat and let syrup cool.
You’ll have extra syrup unless you’re mixing for a crowd. Mine is in an airtight container in the fridge.

Fill a short glass with ice. Pour bourbon and cooled syrup over ice. Twist your orange peel directly over glass until you see the oils release. Place in glass with bourbon, stir, and garnish with a fresh sage leaf.

fullsizeoutput_2b2b
It really was the “Last Pass” for that bottle of Bourbon. Plane etchings adorn all of our barware. Naval Aviation wife problems.

Doing this again, I would muddle an orange slice in a shaker with the syrup and then add ice and bourbon and shake until the shaker is cold, then pour over fresh ice before adding the twist and the sage leaf. This cocktail improved as the ice diluted it and I’d rather just start there. Plus, it was a bit flat until I enhanced the orange.

This cocktail is not sweet so if you like sweeter drinks, feel free to add more honey. Eh, being almost HALF syrup makes this drink quite sweet. It’s also quite strong because the honey is the only mixer, but it certainly doesn’t need to be any sweeter. 

I’d love to try it again soon, but I used the last of our Maker’s Mark (and even had to augment with a splash of Pendleton), and I’m not sure this is worthy of the Blanton’s. Besides, I need the Blanton’s for the fast-approaching Julep Season.

I have a bit of a grocery neurosis. Whenever I come across a hard to find ingredient, it gets stuck in my head, and the next time I see that ingredient, I stock up. Like a squirrel getting ready for winter. (I’m still so mad about not buying that Buffalo Trace I saw IN NOVEMBER.) In this manner, I found myself sitting on close to a pound of candied ginger. That’s a LOT of candied ginger, even for a relatively prolific baker. So, cocktail in hand, I went to Pinterest to find a new way to use some of it up. I’d been craving cookies for a while and always have plenty of chocolate on hand (second grocery problem, I rarely leave the store without chocolate), so this recipe for Candied Ginger Sea Salt Chocolate Chunk Cookies from the Minimalist Baker caught my eye. The recipe uses sea salt chocolate, which I didn’t have on hand (but now I’ll stock up the next time I see it!) but I do have sea salt and chocolate, problem solved.

Candied Ginger and Sea Salt Chocolate Chunk Cookies

Pillowy chocolate chip cookies with tiny little flecks of homemade candied ginger and sea salt dark chocolate. I would not describe my results as “pillowy”. Tasty, certainly, but pillowy, no.
Author: Minimalist Baker
Serves: 30 cookies
Ingredients
1 cup + 2 Tbsp all purpose flour
1/2 tsp baking soda
1/4 tsp ground ginger
pinch salt
1 stick butter, softened
1/3 cup sugar
1/3 cup brown sugar, packed
/2 tsp vanilla extract
1 large egg
3/4 cup sea salt dark chocolate, chopped I used chopped dark chocolate and then added a half tsp sea salt to the dough, then sprinkled a few flakes of sea salt on each cookie
1/4 cup candied ginger, chopped

CANDIED GINGER If you feel like making your own candied ginger, here’s how. That would have defeated the purpose for me, though. If you bought candied ginger, skip to the next bold text.
4-5 small-medium pieces fresh ginger
1 cup water
1 cup sugar
Instructions
To candy ginger, peel and thinly slice fresh ginger, then add to a saucepan with equal parts water and sugar. Bring the mixture to a boil then reduce to a simmer and cook for 30 minutes.
Next, drain and place ginger on a plate or other flat surface to dry, preferably overnight but at least 5-6 hours. Lastly, toss in white sugar.

Let’s get down to business.
To make the cookies, preheat oven to 375 degrees.
Cream butter and sugars together. Then add egg, vanilla and mix again.
Add dry ingredients a little at a time, mixing as you go. Lastly, fold in chocolate chunks and chopped candied ginger.
Scoop into rounded 1 Tbsp. balls and place on cookie sheet. Here’s where I put a few flakes of San Juan Island Sea Salt on each cookie. I’m partial to this brand but unless you have a connection to the Puget Sound, it’s hard to find. Any sea salt will do. Bake for 9-11 minutes or until set in the middle – they should hardly be brown. I will try chilling the scooped dough next time. my cookies came out flatter than I wanted them. Still delicious, but not very pretty. Also, in this manner, you can scoop and FREEZE the dough then store it in a sealed bag in the freezer and bake the cookies in single serve batches!fullsizeoutput_2b29
Leave on the tray for a few minutes and then transfer to a cooling rack to cool completely. Store in an air-tight container or bag for up to 4 days. Alternatively, place in freezer to store longer. These did not last 4 days. Storage was not a problem. 6 thumbs up because two of our thumbs were on a business trip and missed out.


6/52 Super Ro-Tel

received_10155081685519090Everyone can thank my friend Nikki for this recipe. I never planned to count this one, just make it for the family because I earned it this past weekend (which included, in no particular order, blood, sweat, AND tears). In a text, I sent Nikki this picture with a message something like “How many times have I yelled at the kids today? Queso dip many times.” She has small (ADORABLE) kids and I never expect a quick reply but this one was immediate: “That’s for the blog, yes?” Soooooo, here you go.

Having grown up in the suburbs of Cleveland, Ohio, caring who wins the Super Bowl is not something that I have ever experienced. What I have always known, however, is that Super Bowl Sunday is the great American excuse to eat all the junk food that “we don’t keep in our house.” I’ve never had an alcohol hangover on Super Bowl Monday, but food hangovers reach back to my childhood. Something my mom always made was a Velvet-based dip I always knew as “Ro-Tel”. At some point I learned that this food is actually known as queso dip or any number of names and that Ro-Tel is simply the brand of one of the two ingredients in my mom’s recipe: Mexican Velveeta and … boom.

I’ve toyed with the method over the years, using plain Velveeta when unable to find the Mexican variety (which contains hot peppers), draining the Ro-Tel for a thicker dip, adjusting the block/can ratio, but I never added to it.

Until now.

I found an intriguing recipe for Queso Fundido in a magazine (Cook’s Country, not surprisingly) that used REAL CHEESE instead of pasteurized processed cheese food products. Reading on, I also discovered that it required a tedious choreography of grating, seeding, dicing, chopping, and stirring, and my enthusiasm deflated. However, the promise of a better “Ro-Tel” dip that also included Chorizo was enough to make me consider a compromise.

The Ro-Tel would sub in for a great deal of the chopping, especially the part where gloves are recommended. I already had chorizo (I’m an impulse shopper, the ingredients I have on hand would astound you) and had purchased the Ro-Tel and Velveeta with plans to make mom’s standard dip. I wanted to add some real cheese for a more robust cheese flavor and had (like I almost always do) some shredded sharp cheddar cheese in the fridge. The recipe in Cook’s tossed shredded cheese with cornstarch before incorporating it into the dip. I assumed this was to keep the cheese from clumping, so I tossed a few pinches in with my cheddar before adding it. I suspect the cornstarch had an added benefit of absorbing some of the extra water in the Ro-Tel, as the final dip was much thicker than the original. It was wonderfully oozy rather than runny.

So, here’s the recipe as near as I can remember it. I wasn’t measuring, but I did weigh the chorizo so that I can quantify.

  • 1 16 ounce block Velveeta Our local market didn’t have Mexican Velveeta. It doesn’t have much in the way of standard groceries actually, but it’s one of the few groceries in the county that is licensed to sell alcohol AND the closest market to our house because God wants us to be happy. 
  • 1 can Ro-Tel tomatoes and chilis. Just the regular stuff, not the mild or lime or whatever. I buy the only kind they made in the 80s when I first started eating it. 
  • 12 ounces chorizo
  • about a cup or maybe less (definitely not more) shredded sharp cheddar cheese From the bag, like nature intended.
  • a few pinches of cornstarch One pinch was not enough, I think I ended up using 3 or 4? Enough to lightly coat the cheese.

Remove the casings from the chorizo. I used kitchen scissors. This is the hardest and grossest part of this dish. Brown the chorizo in a medium saucepan, making sure to crumble it into small pieces. Spoon the chorizo onto a paper towel lined plate and wipe out the pot.

Return pot to heat. Dump the Rot-Tel (with all the liquid) into the pot and scrape up any chorizo goodness from the bottom.

Cut the Velveeta into several pieces and add to the pot. Stir occasionally until Velveeta is almost melted.

Toss cheddar with corn starch until lightly and evenly coated. Add to the pot and stir until melted.

Return chorizo to the pot and stir.

Enjoy!

I’d love to try this with the Mexican Velveeta or maybe pepper jack in place of the cheddar. If you make any adjustments, tell me about them!

5/52 Chicken Fricassee with Apples

fullsizeoutput_295c
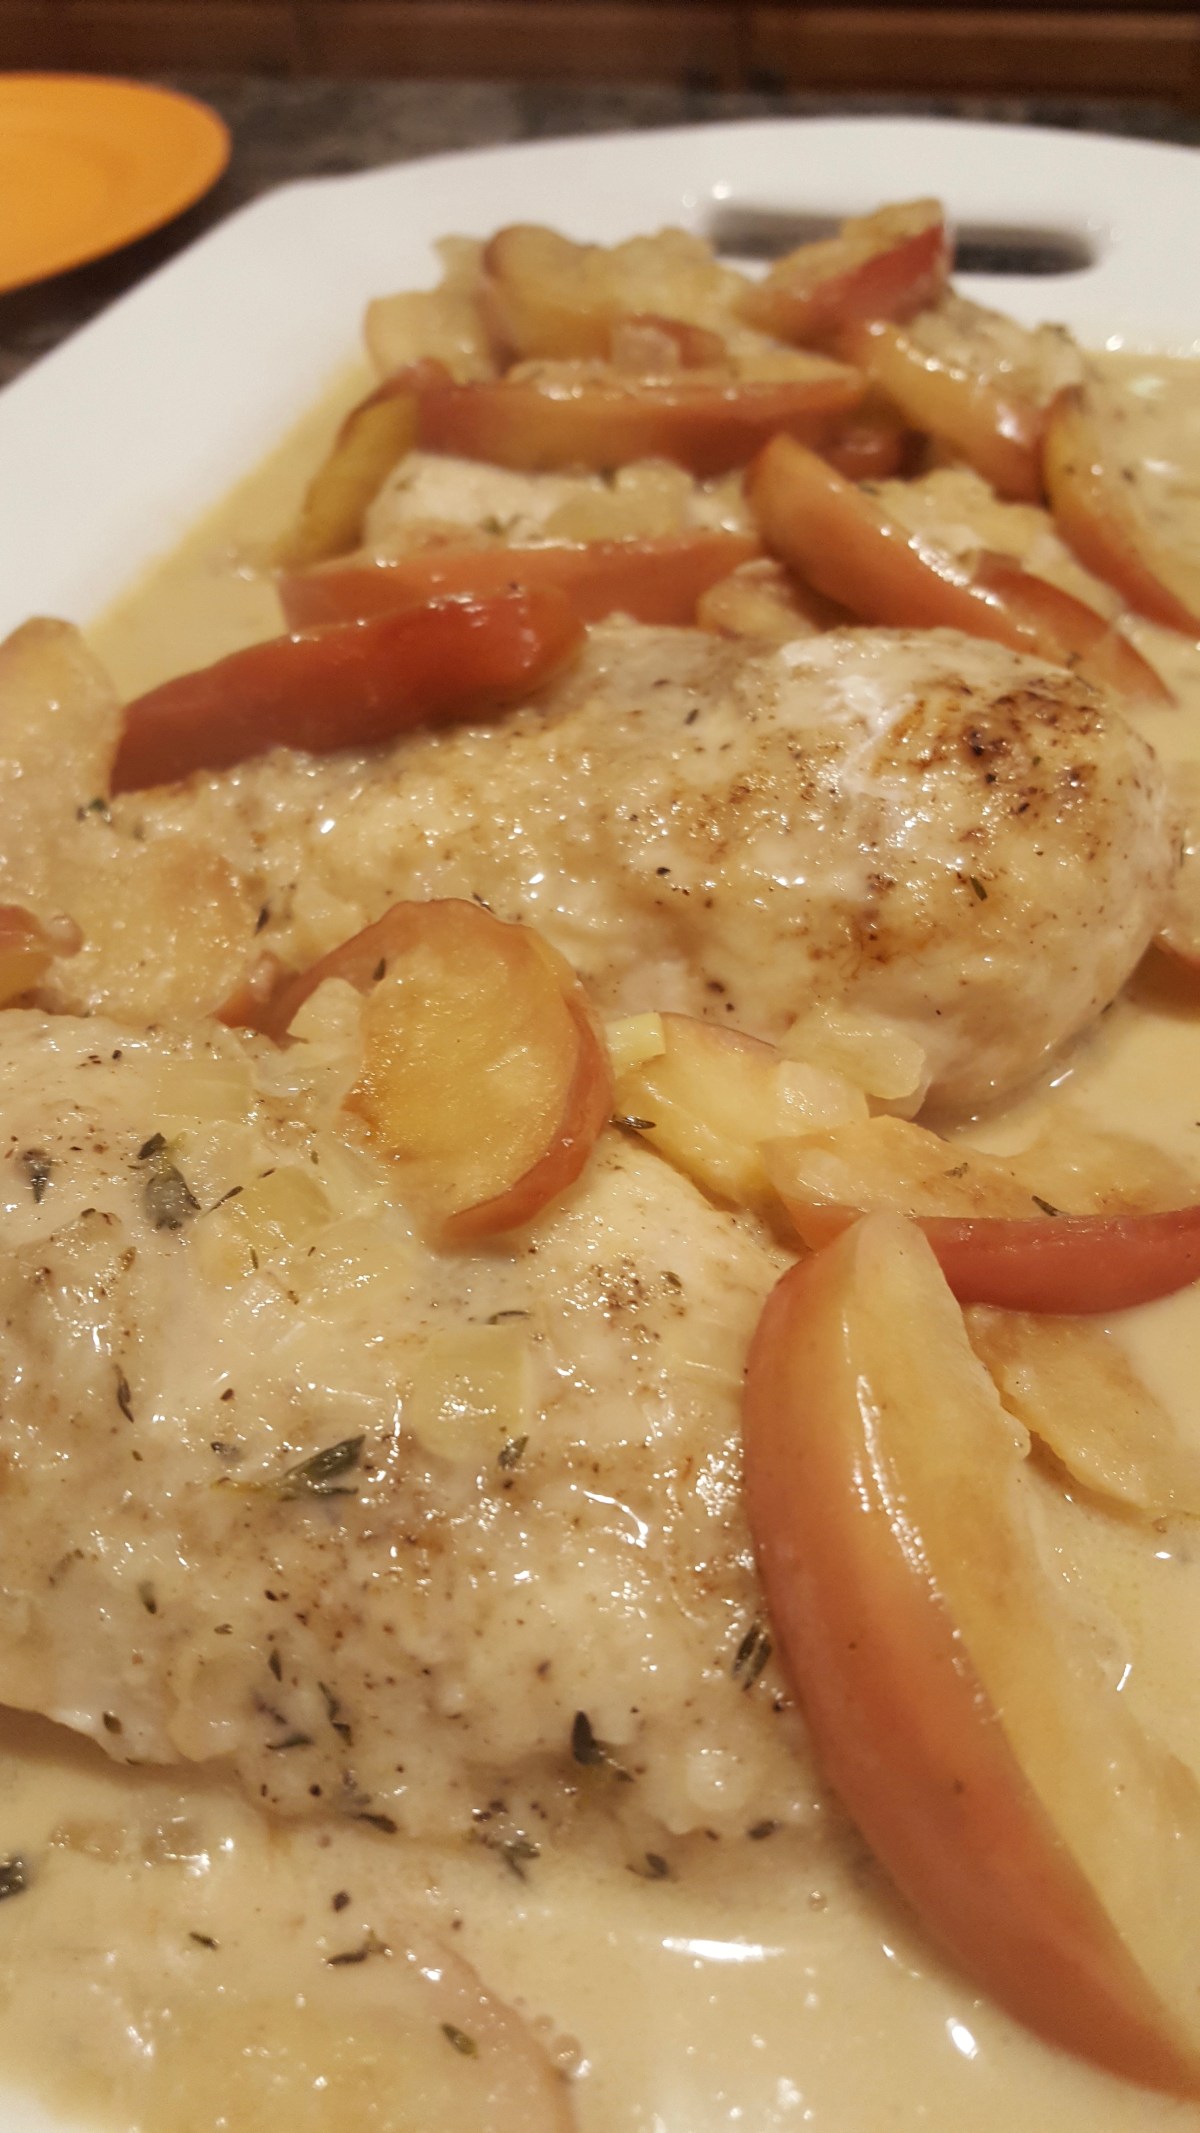
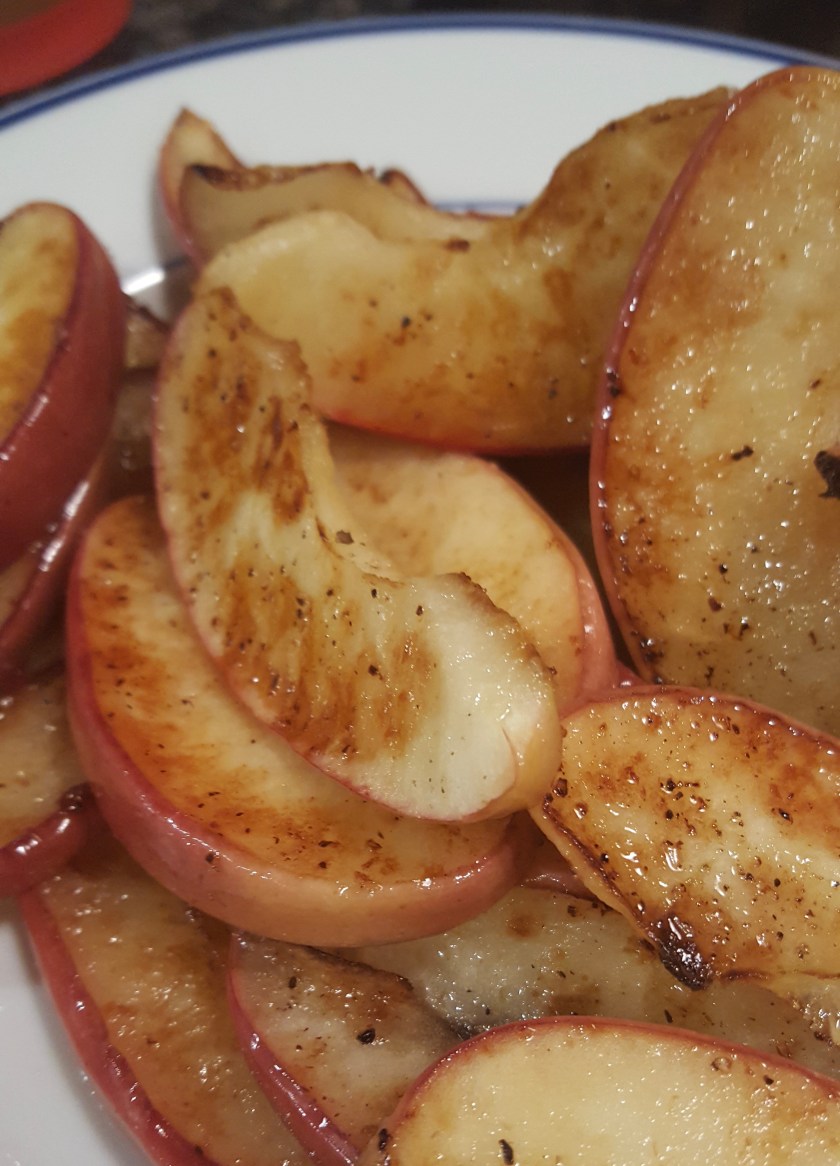
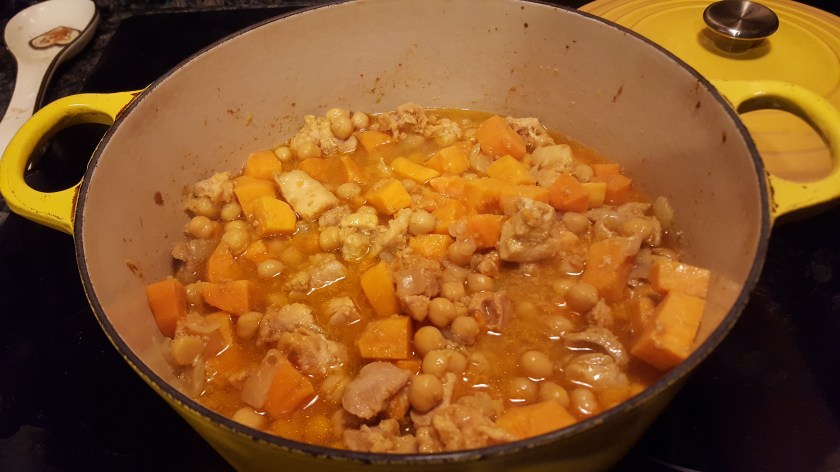
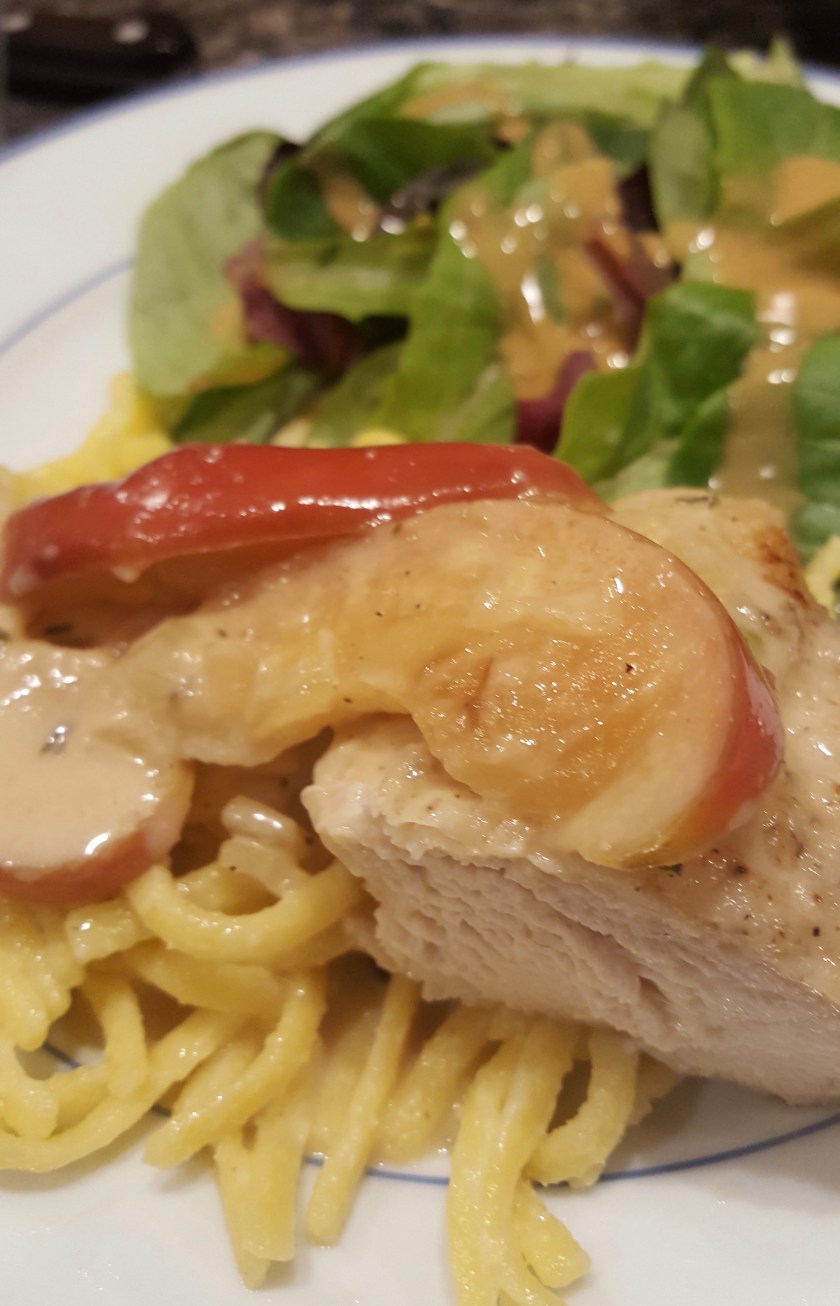
I’d love to have some tender anecdote about cooking comfort food and the season, but ultimately this dish made the cut this week because we already had most of the ingredients. I did buy apples specifically for this because ours are Honeycrisps as big as Meatball’s head, and I found a great deal on the chicken (it was a day from expiring and 50% off) so I didn’t thaw what we already had. I also had to buy cider, but the boys go crazy for it so I got to be the favorite parent for about 45 seconds.

fullsizeoutput_2959
Why did I buy apples when we already had them? Size matters.

If you happen to be a member of Cook’s Country dot com, the original recipe is here . We get the magazine (this one is in the February/March 2017 issue) but do not subscribe to the website, so I’m having to do some extra legwork here. You’re welcome. (It’s a fantastic publication, by the way, with tried and tested recipes that are impressive yet accessible.)

Chicken Fricassee with Apples

Serves 4 (or more)

  • 4 (6-8 ounce) boneless, skinless chicken breasts, trimmed If you can find chicken breasts this small, go for it. The four breasts in the package I bought totaled 3.5 pounds, so the dish ended up serving far more than the recipe states.
  • 1/4 cup all-purpose flour Or more. Giant chicken.
  • 3 tablespoons unsalted butter
  • 2 Fuji, Gala, or Braeburn apples, cored and each cut into sixteen 1/2 inch thick wedges 16 wedges. Don’t worry about the thickness, it will come out right.
  • 1 onion, chopped
  • 2 teaspoons minced fresh thyme
  • 1/2 cup apple cider I’m quite annoyed that the smallest container of cider is a half gallon, but, happy kids.
  • 1/2 cup heavy cream Now is not the time to be virtuous. It’s an ounce of cream per serving at the most, if you’re using Dolly Parton chicken, even less.
  • 2 teaspoons cider vinegar
  • 1 tablespoon minced fresh chives Yeah, this didn’t happen. You know how I feel about herbal garnishes. 

Pat chicken dry with paper towels and season with salt and pepper. Spread flour in a shallow dish. Dredge chicken in flour to coat, shaking to remove excess; transfer to plate and set aside. I didn’t change this step except I needed more flour for the freakishly large chicken breasts. I don’t see why you couldn’t just shake it all together in a gallon bag, though. Fewer dishes!

Melt 2 tablespoons butter in 12-inch nonstick skillet over medium heat. I didn’t realize until I was putting the pan away after making this whole thing and washing it that I used a 10 inch skillet. Aside from having to brown the apples and chicken in batches, everything worked out perfectly well. Season apples with salt and pepper. Cook apples, cut sides down, until browned, about 5 minutes per side, moving and redistributing apples as needed for even browning. Transfer to second plate, set aside. Cut sides down seems pretty self-evident to me here. How else would you brown sliced apples? Anyone? Also, use BUTTER. REAL BUTTER. Related to this, every apple I eat from now on must be browned in butter. If you taste one before the rest of the dish is done, try to save a few for the family. They are that good.

fullsizeoutput_295a
I would have happily eaten these alone for dinner.

Melt remaining tablespoon butter in now-empty skillet over medium heat. Add chicken and cook until lightly browned, about 2 minutes per side. Return chicken to plate. Yes, it’s okay to put the browned chicken back on the raw chicken plate. It freaked me out, too, but you’re going to cook the chicken through in the sauce later.

Add onion, thyme, 1/4 teaspoon each of salt and pepper to now-empty skillet and cook over medium heat until onion is softened and browned, 5-7 minutes. This recipe really likes to point out that after you take the food out of the skillet, it is now empty. Push the onions around a bit to pick up and bits in the bottom of the pan.

Add cider and broth and bring mixture to a boil. Return chicken to skillet (which is presently NOT empty). Reduce heat to medium low, cover, and simmer until chicken registers 160 degrees, 8-12 minutes. IF you have 6-8 ounce chicken pieces. I let mine go 15 and two of them needed about 20 minutes.fullsizeoutput_295b

Transfer the chicken to platter and tent with aluminum foil. NOW is the time for a
clean vessel for the chicken. 
Add cream and apples to skillet. Increase heat to medium-high and bring to a boil. Cook until sauce has thickened slightly, about 2 minutes. Stir in vinegar and any accumulated juices. Season with salt and pepper to taste. I didn’t feel the need to add any salt, but a few grinds of pepper went in. Spoon sauce and apples over chicken and sprinkle with chives. Or don’t. Serve.

I served this over Spaetzle, German egg noodles. Over them for the grown-ups, anyway. The boys had their usual deconstructed dinners. 6 thumbs up for this one, the boys thought the apples were weird. The recipe with 3+ pounds of breast meat made 4 adult dinners, 4 kid dinners, and a lunch.


4/52 Rosemary Maple Bourbon Sour

I knew I’d get behind on this blog. I expected to last more than 4 weeks. In fairness, I have made several dishes lately, but hesitate to call many of them “new”.  Also, for all its virtues, the InstaPot does not make particularly attractive food. Let’s get to it: last week’s post, started a week ago and wrapped up today.

fullsizeoutput_27bd
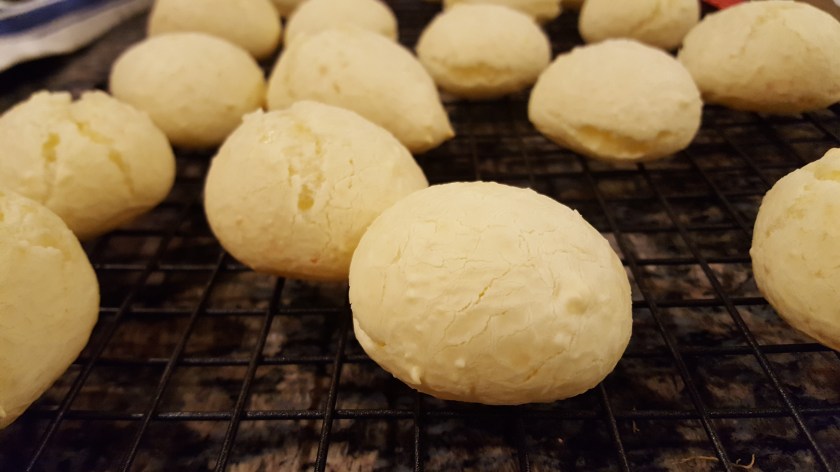
Yes, I’m counting this one. Don’t say I didn’t warn you. Okay, I was being mostly sarcastic last week but with the world going to hell in a handbag, booze is now an acceptable dinner (#alternativefacts). Maybe I’ll whip up a batch of the cheese bread to go with this. Probably not, though, because I don’t think it will last that long. I also made a dessert this week. I’ll share my secret if you keep reading.

I’ve not slept well, I’ve a million and three stressors in my life right now, many of my own creation (two are fighting on the porch right now), and I’m making a reliable standby for dinner (maybe recipe 4.5, but not today). I’m a bourbon girl and had wanted to do a sage bourbon cocktail (we have what can nearly be described as a sage tree in our kitchen) but alas, it requires an orange peel and this house hasn’t seen an orange since I made fruitcake over Thanksgiving weekend. So, Pinterest to the rescue, I found one that uses lemon (the world’s saddest lemon just happened to be rolling around in our produce bin, probably since Christmas), rosemary (happy day! we also have a slightly out-of-control rosemary shrub), maple syrup (one of the four Elf food groups! Told you this could be a meal), and bourbon.

fullsizeoutput_27bc
Sad lemon, happy results!

Here is the original recipe. It makes 2 drinks. I had planned to make the original recipe so I could give it a fair review (and also because halving 3/4 of a shot of syrup seemed like a hassle) but our lemon was SO SAD that I could only squeeze one ounce of juice from it, even with my incredible citrus press(courtesy of EJ Moore).


For one sour:

  • 1 small sprig rosemary plus one for garnish

    fullsizeoutput_27bb
    Equipment, front to back: weekday shaker, weekend shaker, citrus press. Yes, those are my Hemingway books on the window sill. They feel at home near the bar.
  • 2 ounces of bourbon (recipe called for 3 shots, a shot and a half is 2.25 ounces, which is too tedious for a weeknight cocktail)
  • 1 ounce lemon juice (again, recipe called for 1.5 shots, and 1.125 ounces? please)
  • half an ounce of maple syrup (because decimals, again. And make sure you’re using real maple syrup here)

Crush the large sprig of rosemary in your hand and add it to the shaker. I muddled the rosemary in the shaker. I’d rather have the aromatic oils in my drink than on my hands.
Add the bourbon, lemon juice, maple syrup and ice to above the level of the liquid and shake vigorously for 15 seconds. I guess it was about that long? I shake until the entire shaker feels ice cold. I think I saw that on Good Eats.
Strain the mixture into rocks glasses containing large cubes of ice and garnish with remaining rosemary sprigs. I wanted a little more rosemary essence so I rubbed a sprig around the rim of the glass before dropping it in the drink. 

I would definitely make this again. Though I’d prefer to make the whole recipe or even double it for guests. Then I could use my weekend cocktail shaker. I like that with a few adjustments, you could make this as sweet or as tart as you like on the spot, since the maple syrup dissolves readily into the cocktail.

UPDATE: I did end up making the cheese bread. And I actually followed the recipe this time and things turned out much better than before.

For dessert, Super Secret Brownies… here’s your reward for reading all the way to the end:

Buy a box of Baker’s Unsweetened Baking Chocolate and follow the recipe printed inside (conveniently, the ingredient list is printed on the outside so you don’t have to hit the grocery twice). Omit nuts if your children, like mine, don’t like “those little yellow things.” I substitute chocolate chips.

I’m actually doing a legit meal this week. Standby for recipe #5.


3.5/52 Pao de Quiejo (Brazilian Cheese Bread)

20170116_180313

Another gem from Nigella here. No, she is not Brazilian, but this recipe is from a Brazilian friend of hers, according to the forward to this recipe in Simply Nigella.

These little spheres of cheesy goodness are entirely unique and (I’m warning you) highly addictive. Their matte, bland appearance belies the chewy texture within. My first-grader gave them eight yums, and I suspect that’s how many he ate when we served them with dinner.

The Recipe

Makes 50 pieces I halved it. And I’m glad I did because if I had made 50 of these, we would have eaten every single one.

Ingredients

  • 2 cups tapioca flour
  • 1 teaspoon fine sea salt
  • 1 cup whole milk I used 2% because it’s what was on hand
  • 1/2 cup vegetable oil Light olive oil here
  • 2 large eggs, beaten
  • 1 cup shredded parmesan In the forward, Nigella suggests store-bought shredded parmesan. I used store-bought grated parmesan for more uniformity in texture. I did not buy a green can of Parmesan, I went for the Italian version in the gourmet cheese section of the grocery because I’m fancy like that.

Preheat the oven to 425 and line 2 large baking sheets with parchment, or use one sheet and bake in batches. Or halve the recipe like I did.

In a freestanding mixer, using the flat beater, or with a handheld electric whisk and bowl, combine the tapioca flour and salt. I was not paying attention and used the whisk attachment on my freestanding mixer. Also I mixed in the cheese here as well for some reason. I don’t think the first flub made a difference but adding the cheese did. Don’t add the cheese yet!

In a saucepan, heat the milk and oil, bringing gently to a boil and once it’s bubbling, take the pan off the heat before it becomes a full rolling boil. Pour immediately into the flour mixture and turn on the motor, though not too fast at first, beating until it forms a sticky batter. Even when I started the mixer on the lowest setting, I set off quite the tapioca cloud. It’s a VERY fine flour.

Carry on beating  for at least 5 minutes (as you want it to cool down before you add the eggs) then scrape down and check with your fingers to see if it is still hot to the touch. You need it to cool to about body temperature,which could take up to ten minutes of beating. 

Once you have reached this point, duly whisk in the beaten eggs, spooning them in very gradually, about a tablespoon or so at a time, and make sure that the egg is fully amalgamated before you add the next spoonful. Here’s where I think adding the cheese early messed things up a bit. My batter was SUPER runny, I suspect because the cheese melted from the hot milk. I ended up adding quite a bit more flour before it came close to resembling something scoop-able.

Finally, add – still beating – the Parmesan cheese in 2 batches, and continue to beat until all ingredients are, again, well combined. I added a little additional cheese here anyway because “too much cheese” is not an accepted concept in my kitchen.

Scoop teaspoon-sized balls onto the lined baking sheets. If you are baking in batches then refrigerate the unused batter as it waits. I use a rounded measuring spoon and, if needed, dip the spoon in water every couple of scoops, as the dough then drops out of the spoon more easily. I used a 2-teaspoon disher and didn’t fill it quite full for each scoop. My dough “balls” were more like dough puddles, but they baked beautifully. I think chilling the dough before dishing might be something to try next time.

Put in the oven, then immediately turn the heat down to 375, and bake for 12-15 minutes, until puffed and with a golden tinge. Let the cheese breads cool a little before serving. I think mine took closer to 15 minutes but then they were a little wetter to start. 

Note

The bad news is that once cooked, these don’t keep well. The flavor remains but the texture changes to that of styrofoam. The good news is, you can chill the dough for up to a day or freeze unbaked, scooped breads for up to three months. Scoop, freeze on a sheet pan, then transfer to a storage bag and bake as needed per directions above.


3/52 Sesame Noodles and Asian Meatballs

20170117_190025

This was a great cooking week at our house. The three-day weekend provided plenty of extra time to experiment and create longer-cooking dishes. I was actually able to bank a recipe for another (less culinarily productive) week. This week will even have a BONUS RECIPE (in a separate post). You’re welcome.

6/8 thumbs up for this one. The grown-ups approve. Big brother loved it and gave it a “triple yum” rating. His scale for yums stars at one yum for something he likes and goes to thirteen yums for ice cream. The bonus recipe this week got eight yums.

Our youngest hive member did NOT share his brother’s enthusiasm. He thought it looked terrible, and therefore upon further inspection decided that it smelled terrible and was determined to prove that it also tasted terrible. (He’s really working his last month of being four.) He can also trigger his own gag reflex so in a world of macabre irony, he ended up eating a second serving of this terrible meal after a spell in his room. (Worst. Mom. EVER.) Also ironically (irony is a large part of what gets me through life), his nickname here is Meatball. It was a rough Tuesday evening for Meatball; mom made the worst dinner ever served to a family in the history of family dinners and he rediscovered that he is younger than his brother (with a 22-month age gap, he forgets this more often than you’d think). We spent quite a bit of our goodnight routine lamenting being born last, and the dog doesn’t count so he is the “last borned person” in the family and that makes him VERY sad. As I finally sat down to finish MY dinner, I decided next week’s recipe is going to be a cocktail. Maybe with a dessert. That dessert might be my famous “Chocolate Chips Straight Out of the Bag”.

Although this recipe is more involved than the previous two, I was able to split up the work so that all the chopping and mixing and forming meatballs was done during the school day, and all I had to do after coming home from Tae Kwon Do was cook and plate. I was also able to finally use up the straggling produce left over from week one’s Pressure Cooker Pho. Leftovers are delicious and the sauced noodles can stand on their own if you want a meatless option. I’d also like to try it with soba (buckwheat) noodles. Gluten free? This would be good with wide rice noodles, too.

The recipe is available online here. As usual, my annotated version is here:

Sesame Noodles and Asian Meatballs

In about an hour and a half, you can have this distinctive pasta dish on the table.

When you’re preparing the meatball mixture, be sure to knead it a bit before rolling it into balls. The more you knead it, the firmer it will become. This odd tidbit turned out to be very useful information. The mix seemed quite loose as I started mixing but sure enough, with some kneading it started to become stiff enough to scoop.

FOR THE SAUCE

3 tablespoons water
1/4 cup coarsely chopped scallions (white and light-green parts) About 3 medium scallions
1/4 cup hoisin sauce
1 tablespoon fresh lemon juice
2 teaspoons low-sodium soy sauce
1 1/2 teaspoons toasted sesame oil
1 teaspoon hot sauce, or more as needed I used Frank’s. Thought about Sriracha but feared it would bring too much heat for the kids.
6 tablespoons creamy peanut butter (unsalted) I used store brand peanut butter. We eat crunchy so I keep a jar of the cheap stuff around for recipes. It wasn’t unsalted and I don’t think that made a bit of difference. I would not go out and buy a special jar of peanut butter for this.
Kosher salt Since I happened to use pre-salted peanut butter, I skipped this, and didn’t need to add any “to taste” at the end

FOR THE MEATBALLS AND PASTA

1/4 cup minced scallions (white and light-green parts) Again, about 3 scallions
1 pound ground pork
1 large egg, lightly beaten
2/3 cup finely chopped cabbage, preferably napa cabbage My local market had 9 heads of cabbage that morning. Six were standard green cabbage and three were Savoy, and they all looked like half-deflated playground balls. I went with a smallish Savoy and tried to remove the most wilted of the leaves before paying. 
2 tablespoons finely chopped fresh cilantro, mint or basil, plus extra, chopped, for garnish I recommend cilantro unless you’re unfortunate enough to have the genetic mutation that makes you hate cilantro.
1 1/2 tablespoons low-sodium soy sauce
2 teaspoons finely grated, peeled fresh ginger root
1 teaspoon minced garlic I used a microplane for both the ginger and the garlic. Only one tool to clean that way.
1/4 teaspoon toasted sesame oil
1/4 teaspoon kosher salt, plus more as needed I’m not sure how you would know if you need more here, since this goes into raw meatballs. I didn’t need any more so maybe just take my word for it and don’t eat raw pork. 
1 pound dried linguine Or any long pasta. I have a case of spaghetti in the basement so I used a pound of that.
2 tablespoons vegetable oil
1 cup low-sodium chicken broth Used my magic concentrate (see recipe 2) here!

DIRECTIONS

For the sauce: Combine the water, scallions, hoisin sauce, lemon juice, soy sauce, toasted sesame oil, the teaspoon of hot sauce and peanut butter in a blender or mini food processor; puree until smooth. Taste and add salt and/or more hot sauce, as needed. A mini food processor? As a passionate and long-time collector of kitchen gear, I am guessing that if I have never had one of these, most home cooks don’t either. A standard food processor works just fine. Or a blender. You may have to add some of the broth (it all goes together at the end anyway) to get it moving, depending on the size of your blender/food processor. My 14 cup processor had no problem with the small amounts here.

Bring a large pot of water to a boil over medium-high heat. I threw caution to the wind and went full high heat here because MY TIME IS PRECIOUS.

Meanwhile, make the meatballs and pasta: Combine the scallions, ground pork, egg, cabbage, the 2 tablespoons of finely chopped herbs, soy sauce, ginger, garlic, toasted sesame oil and 1/4 teaspoon salt in a mixing bowl. Use your clean hands to mix and knead until well incorporated. Shape into 24 to 26 walnut-size meatballs. I did this a few hours in advance. I also wore disposable gloves for the mixing and rolling and used a two tablespoon disher to measure. I got 25 meatballs and kept them covered on a lined baking sheet in the fridge until I was ready to cook. 

Add enough salt to the boiling water so it tastes lightly salty (“Tastes lightly salty” HOLD UP. The saltiness of the water is not so critical that you need to melt your tongue tasting it. It’s boiling, DO NOT PUT IT IN YOUR MOUTH, just throw in a handful of salt. Save your taste buds for dinner!), then add the linguine to the boiling water; cook for about 6 minutes, or just slightly less than al dente. Drain, reserving 1 1/2 cups of the pasta cooking water.  Don’t rinse the pasta. The residual starch helps the sauce adhere. Or so I’ve read. 

Heat half the vegetable oil in a large skillet or saute pan over medium heat. LARGE skillet or saute pan. I missed that one word and ended up having to heat (and wash) a second larger pan. 

Once the oil shimmers, add half the meatballs, being careful not to crowd the pan. Cook for about 4 minutes, turning them as needed; they should be browned on all sides and give a little when pressed with a finger. They will not be quite cooked through. Transfer to a plate. After 4 minutes, my meatballs were still very visibly raw. Browning and cooking took closer to 7-8 minutes. Not much cooking happens after this step so get them to where you’d be comfortable eating them now.

20170117_184607
Browned and ready for sauce and spaghetti.

Add the remaining vegetable oil; once it’s shimmering, cook the remaining meatballs the same way, and transfer to a plate. Reserve the skillet. Same as the first batch, cook longer.

20170117_184611
The “browned bits”

While the pasta is cooking, add the broth and sesame peanut sauce to the skillet and cook for 2 minutes over medium heat, stirring with a spatula to dislodge any browned bits. Add the drained linguine; cook for 2 minutes, stirring and adding some of the reserved pasta cooking water to thin out the sauce, as needed. I didn’t need any additional liquid, but the way the timing worked out, my pasta hadn’t been out of the pot that long so it had a fair amount of surface liquid still clinging.

Return all the meatballs to the skillet and toss gently to coat. Cook for a few minutes, until heated through.

20170117_190012

Divide among shallow bowls. Top each portion with chopped cilantro. Serve right away. Maybe in an alternate universe I have the wherewithal for an herbal finish. But not here, not this meal.

Note

The article in the Post adds “Serve with spiced peas – frozen/defrosted, with sautéed caramelized onions that are spiked with mustard and cumin seeds – and, for a finishing touch, a refreshing salad of arugula, orange, and sliced radish.” I laughed out loud about this as I put grape tomatoes on one plastic plate and leftover broccoli on the other. Maybe when we arrive at the days of herbal finishes I’ll consider spiked sides and bitter greens. 

2/52 Chicken Cosima

20170111_184222This recipe almost didn’t happen. Dragged down by a nasty cold, I almost took a bye this week. Hunkered down under a blanket on the couch, flipping through Nigella Lawson’s newest cookbook, Simply Nigella, I found a recipe for which I already had most of the ingredients, that required very little hands-on time, and used a single pot. Sold.

My girl-crush on Nigella Lawson is no secret. I started watching her on the Cooking Channel when I was pregnant with our oldest and kept watching while nursing him. She’s intelligent and warm and gorgeous and refreshingly practical. It was her show (and book) Nigella Express that gave me a little boost out of my postpartum depression and inspired me to get back into the kitchen. Everything seemed so incredibly overwhelming in those early months, but she made it seem possible to once again enjoy the cooking I had so loved and missed. One evening my husband went out to a formal event for work and although I was in no place physically or mentally/emotionally to join him, I had my own party. G spun around in his Exersaucer while I made myself pasta carbonara and fruit with butterscotch sauce. That meal, eaten in my pajamas on the couch (while on and off nursing a baby), easily makes my lifetime top ten food experiences.

Simply Nigella differs from other books of hers (that I’ve read) in that the recipes are less, well, hedonistic (my miracle carbonara from above included bacon, wine, butter, cheese and heavy cream). The introduction is (of course) beautifully written and describes cooking for oneself in terms of self-care, not just because when we cook we tend to use better ingredients than pre-packaged foods contain, but that the act itself has a therapeutic value. The recipes in this book are not frenzied, designer meals (though they are beautiful), but rather achievable dishes using wholesome ingredients. Calorie counts are nowhere to be found. It’s food for nourishment and pleasure, with no expectation to offset it on the treadmill.

The recipe is below, with my notes in bold.

Chicken Cosima (serves 6)

  • 2-3 tbsp all purpose flour  my husband and I agreed that more flour next time would be a nice addition to give the liquid a little more body. I would increase to 1/4 cup20170111_171158
  • 1 teaspoon ground coriander  I had whole coriander seed, which I mashed up pretty well in a mortar and pestle. Didn’t notice any hulls or stems in the final dish, so I’d do it that way again
  • 1 teaspoon ground cumin
  • 1/2 teaspoon ground turmeric
  • 1/2 teaspoon paprika My Hungarian heritage requires me to say here that high quality paprika makes a huge difference. If you can find it, imported Hungarian sweet paprika is the way to go. Hot or smoked paprikas are NOT equivalent.
  • 1/2 tsp sea salt flakes or kosher salt  Coarse salt. If you use fine sea salt, reduce the amount or wait until the end to add it.
  • 6 large boneless skinless chicken thighs, cut into bite-sized chunks I didn’t plan well and my chicken was still a bit frozen in the middle. This actually made it easier to cut and did not affect the end result.
  • 1 tablespoon cold-pressed coconut oil or regular olive oil I used light olive. I have some refined coconut oil (husband hates coconut) but it solidifies in the winter and I didn’t feel like chiseling it out of the jar.
  • 1 onion, pee20170111_175032led and chopped hardest part of the recipe, especially if you’re a super sensitive onion crier like me.
  • 1 pound sweet potatoes, peeled and cut into one-inch chunks
  • 2 cups hot chicken broth I use Better Than Boullion concentrate. The taste can’t be beat and I can make small amounts of broth for recipes and not be stuck with half a box of it in the fridge. It takes up very little space in the fridge and cup for cup is much more economical than canned or boxed broth.
  • 3 cups chickpeas, home cooked or drained from cans  That’s 2 cans. 
  • chopped fresh cilantro, to serve More often than not I skip the sprinkle of herbs at the end but I had cilantro left from the pho last week and do think it made a difference in this dish. 
  1. Preheat the oven to 400. So… I forgot the first step, which added a bit of time to my dish but was not the end of the world. Still, don’t forget to preheat the oven.
  2. Measure the flour, spices, and salt into a resealable bag and then tip in the chicken. Shake the bag around to coat the chicken with the floury spice. I shook the bag once before adding the chicken to make sure the spices were evenly distributed in the flour. 
  3. Heat the oil in a wide Dutch oven or pan (with a lid), and then fry the onion until softened but not really colored. We call our Le Cruset Dutch oven “the magic pot”, partly because everything that comes out of it is delicious and partly because no matter what we cook in it, it cleans beautifully. You don’t need an enameled cast iron vessel for this, just make sure what you’re using is oven-safe.
  4. Add the chicken and all the contents of the bag to the pan, and stir around for a minute or so, then add the peeled and chopped sweet potatoes and stir again. “A minute or so” – this is why I love Nigella. We’re not formulating a polio vaccine here, it’s just dinner. Relax!

    20170111_174551
    Chicken and onions patiently awaiting the sweet potatoes.
  5. Pour in the hot broth, then bring the pan up to a boil and tip in the drained chickpeas. Give it another good stir, then clamp on the lid  and put in the oven for 25 minutes. It doesn’t say here, but I always rinse canned chickpeas. Because my chicken went in a little icy, I increased cooking time to 30 minutes.
  6. Check that the chicken is cooked through and the sweet potatoes are tender, then take out of the oven and leave with the lid on to stand for about 10 minutes. No notes here. Do these things.

    20170111_184037
    Ready to plate (or bowl)
  7. Ladle into bowls, sprinkling each with chopped cilantro. I served this with naan. You can make your own naan, but decent naan is becoming widely available at grocery stores. Conveniently, my naan reheated at 400 degrees so I just popped it into the oven after removing the chicken. Rice would also be good if you want to round out the meal, though it certainly stands well on its own.

Before trying Chicken Cosima, my children hated sweet potatoes. This did not change their minds. They did discover that they love chickpeas (actually G likes chickpeas, whereas H is partial to garbanzo beans). The chicken was a hit all around and it made enough for the 4 of us (with naan) and 4 single-serving containers of leftovers.

1/52 Pressure Cooker Chicken Pho

20170104_183010-1
Beautiful, beautiful-FUL SOUP!

The first recipe of #fiftytwoin2017 hits many of the bullet points in my to-share list for this challenge: to try various global cuisines (pho is Vietnamese), include some gluten-free recipes (rice noodles), and to make use of different cooking methods and appliances – this one uses the PRESSURE COOKER.

The pressure cooker! The bazillion-in-one kitchen appliance you probably didn’t even know you needed! It sears, it steams, it makes rice, yogurt, and even hard-cooked eggs! The pot insert is dishwasher safe! Makes chicken stock in 45 minutes! Makes otherwise subdued writers break personal records for exclamation points in a single paragraph!

I’d been terrified of pressure cookers for a long time before finally coming around. I suspect an after school special is to blame (without after school specials, how are kids these days instilled with relevant yet slightly irrational fear?), and I am still a little freaked out by the stovetop models. So far my 6-quart InstaPot has proven itself safe, foolproof, and as easy to clean as it is to use. If you can drive a car (even poorly), you can handle an InstaPot. Like many things in a busy mom’s life, though, mine has been used regularly but not very creatively: yogurt, rice, eggs, repeat. I was so excited to find a pressure cooker recipe for one of my favorite dishes, I couldn’t not try it.

Written for a stovetop cooker (dun dun duuuunnnnn), this pho recipe is from the January 2017 issue of Sunset magazine. Sunset is a West Coast lifestyle magazine, and while we no longer live in the Puget Sound, the recipes are still delicious on the Chesapeake. If you don’t have a pressure cooker (explain yourself), this can be done in a stockpot (but will take FOREVER).

This recipe made large (I couldn’t finish mine) pho dinners for two adults with chicken and noodles for two soup-averse children (almost 7 and almost 5), PLUS enough leftovers for at least 4 normal sized bowls of pho. Second night dinner was at least as good as the first, possibly better.

The original recipe is here, where you’ll find the stovetop cooker and stock pot versions. My annotated version (notes in bold), including instructions for an electric pressure cooker, is here:

BROTH

  • 1 whole chicken (4 lbs.) My chicken was closer to 5 lbs. No adjustments needed.
  • 1 rounded tbsp. coriander seeds
  • 3 whole cloves
  • 1 medium yellow onion, peeled, halved, and sliced 1/2 in. thick
  • 1 3-in. piece ginger, peeled and thickly sliced
  • 1 small Fuji apple, peeled, cored, and cut into thumbnail-size chunks Thumbnail-size chunks? Just chop it up. It’s getting cooked to death anyway. And I have no idea what kind of apple I used. It was mostly red and probably a Gala or a Cripps Pink. Any sweet, firm-fleshed apple will do. Except Red Delicious, which have no purpose outside office break room fruit bowls and should be renamed Red Decorative or Red Disgusting.
  • 3/4 cup coarsely chopped cilantro sprigs For this, don’t even bother removing the stems.
  • About 2 1/4 tsp. fine sea salt I tried to go light on the salt for some virtuous reason and ended up adding the difference and then some in the end. 8 cups is a lot of water and it needs to be seasoned properly
  • About 1 1/2 tbsp. fish sauce
  • About 1 tsp. organic sugar* or 2 tsp. maple syrup, if needed to round out flavor I used turbinado sugar because I happened to have it. I wouldn’t go out and buy special sugar for this.

BOWLS

  • 10 ounces dried narrow flat rice noodles I could only find 6.75 ounce packages, so I went ahead and cooked two. We will be eating rice noodles until the end of days. 6.75 ounces would have been MORE than enough for the 4 of us.
  • About half of cooked chicken from the broth
  • 1/2 small red onion, halved lengthwise, then thinly sliced and soaked in water 10 minutes This goes into the bowl raw. So if your family is super onion averse, save yourself the work.
  • 1/4 cup thinly sliced green onion, green parts only
  • 1/4 cup chopped fresh cilantro leaves
  • Pepper totally optional
  • VIETNAMESE HERB GARNISH PLATE
  • VIETNAMESE GINGER DIPPING SAUCE Also optional.

First, make the broth. And IT KEEPS so you can do this hours or even a couple of days in advance. The essence of pho is the complex, delicate, flavorful broth that has to be just right. The pressure cooker makes this most important and complicated step so easy that boiling noodles right before serving is the most difficult part of the dish (we’ll get to that, it’s actually a bit of a process).

1. Make broth: Rinse chicken and set aside to drain. I do not rinse my chicken. If you cook it enough to kill the inside bacteria you’ll kill the outside bacteria as well. I’m more worried about raw chicken splashing and dripping all over my kitchen. (Feel free to imagine a raw chicken bathing like a toddler in my kitchen sink.)

Put coriander seeds and cloves in a dry 6- to 8-qt. pressure cooker. Over medium heat, toast until fragrant, shaking, several minutes. Add onion and ginger and cook, stirring, until browned on edges, 2 to 3 minutes. Use the “Saute” setting on the electric cooker for this. (One pot! Yes!) The ginger and onion will stick like crazy to the bottom, that’s the idea. Don’t panic.

“Traditionally, the ginger and onion would be charred directly on a burner. I’ve found that this is the best shortcut to get that flavor,” says Nguyen. Oh, that’s why we’re doing this. Cool, I love a good shortcut.

2. Add 4 cups water, then the chicken, breast side up. What I’d change next time: add ONE cup of water and scrape up all the brown tasty bits from the bottom, then add three more cups and the chicken.

Add apple, cilantro, salt, and another 4 cups water. “Having only half the water in the pot when the chicken goes in means you won’t splash yourself.” This seems silly unless you have ever (maybe many many times) splashed yourself with raw chicken water. (I never thought I’d write or even care so much about splashing raw chicken.)

Lock the lid in place.

3. Following your cooker’s instructions, bring to low pressure (8 psi) over high heat. Lower heat to maintain pressure. Cook 15 minutes, or a few minutes longer if your cooker’s low setting is less than 8 psi. If your cooker has only a high-pressure (15 psi) setting, cook 12 minutes.

For the electric models: Set the valve to Sealing and use the Manual setting to set the cooker for 15 minutes at low pressure. My pot with the 5 lb chicken took 35 minutes to come up to pressure before the cook cycle started. This isn’t an instant dish, but you don’t have to monitor it at all. 

20170104_181043
Noodles waiting for a soak. Noodles for daaaaaaays.

4. While broth cooks, soak noodles in hot tap water until pliable and opaque, about 10 minutes. Drain, rinse, and drain well. Divide among four large soup bowls. If you’re not doing this more than a couple hours in advance, don’t wait to do this. I made that mistake and things started to go a bit sideways at the end as I was trying to plate everything.

5. When broth is done, lift cooker to a cool burner and let pressure decrease until pressure indicator drops, about 20 minutes. Just let it depressurize on its own. At this point in my cooking I had to go get G from the bus stop so I can only tell you that depressurizing took somewhere between 7 and 25 minutes.

Remove lid.

6. Let cool 5 minutes, then use tongs to transfer chicken to a bowl. “Don’t worry if some parts fall off. Just add them to the bowl too.” I lost a wing in this step. I have nothing to add except be sure to tilt the chicken before completely removing it from the pot to pour out any liquid trapped in the cavity. Add cold water to cover, then soak 10 minutes to cool. Pour off water, partially cover chicken, and set aside to finish cooling.

7. With a shallow ladle, skim most of fat from broth. Strain broth through a muslin- or cheesecloth-lined strainer into a medium pot, pressing to expel as much broth as possible. I did not line my strainer with cheesecloth. If you have a fine mesh strainer you shouldn’t need to, either, but don’t skip on pressing the solids, it releases a surprising amount of liquid. Discard solids. If you’ve got the time, you can strain the broth and chill it, and the fat will solidify and you can remove it more easily. If you are eating this same day and only have one mesh strainer, WASH IT NOW.

Season broth with fish sauce, plus salt and sugar to taste. “Add fish sauce now, at the end. Otherwise you lose some of its umami oomph.” So if you strain and chill, wait to season until you’re reheating the broth to serve it.

20170104_161814
Broth, after the chicken is out, before straining and skimming

8. To serve, bring broth to a simmer over medium heat. Fill a medium pot with water and bring to a rolling boil for noodles. Triple check your water burner and make sure it’s not set to medium low because water takes FOREVER to boil that way. Or so I’ve heard. Also make sure the pot is shallow and/or full enough that you can submerge your mesh strainer in it.

9. Meanwhile, prepare your pho assembly line: Slice breasts and legs from chicken; set aside half for another use. Yes! This recipe gives you a WHOLE EXTRA HALF CHICKEN. Enchiladas! Chicken Salad! Regular salad! Sandwiches! Eating out of the container over the sink after the gym (if you’re into that sort of thing)! 

Cut or tear breast and leg meat into 1/4-in. slices or shreds (discard skin) and put in a bowl. Put red onion, green onion, cilantro, and pepper in separate small bowls. I lovingly sliced, soaked and then threw out the red onion. 

Set out the bowls of soaked noodles.

10. The noodles were the most complicated part for me; everything happens rather quickly. I did my kids’ broth-less noodles first so they’d be cooler than lava by chow time. By washing your strainer in step 7, you’ve saved yourself from frantically scrubbing a strainer while you’ve got two hot pots on the stove.

When water is boiling, tip the first bowl’s noodles into a noodle strainer or other small mesh strainer. Dunk strainer into boiling water, stirring noodles with chopsticks or a fork to loosen them, until they’re soft, 20 to 40 seconds. “Lift one out and pinch it to see whether it’s tender. Some noodles are thicker and need more time.” Pull strainer of noodles from water, shaking to drain into pot, and empty into the soup bowl. Inexplicably, my thin noodles took FOREVER, maybe because my water wasn’t at a full rolling boil, but more of a moderate bubbly boil. Allow a little extra time for this step.

Top with chicken. “Arrange the chicken so it’s flat in the bowl. That way, it gets nicely heated by broth.” Add red onion, green onion, cilantro, and a sprinkle of pepper, to give it a little pop. I did not pop my broth with pepper. Oops.

11. Taste broth once more and season with fish sauce, salt, and/or sugar if needed. Divide among bowls. Serve immediately, with Garnish Plate and Ginger Dipping Sauce. I did a garnish plate with Cilantro, Mint, sliced jalapeños, green onions and lime wedges. I would have used basil if I had found any at the grocery. The recipe has bean sprouts on the garnish plate as well. I almost bought some but then remembered in the 10+ years I have been enjoying pho, I’ve never once added sprouts. I also had sriracha and chili garlic sauce on the table. If I were serving this to only adults on a weekend, I would love to try the dipping sauce recipe included with this. The chili garlic sauce was an acceptable stand in for the half of my family that goes for sauce of any kind, and the hardest part of it was peeling the inner seal off the jar.

12. The recipe doesn’t include this step, but ENJOY.


A Non-resolution

How the Hive came to be

I don’t do resolutions. More accurately, I don’t do New Year resolutions. The date seems rather arbitrary and expectations for a fresh calendar are already too high. In years past I have done birthday resolutions for MY new year, and starting a blog has been on the preliminary list many times, but has never made the final cut.

Why is this year different? Because 2016. Because we moved across the country and I had, in the three years since we last moved across the country, forgotten how thoroughly taxing that is, because the entire celebrity population of my childhood died, because global politics is playing out on Twitter now and the world has stopped making sense. I needed a fresh approach, but the idea wasn’t meant to be a blog.

I decided to challenge myself to try fresh ideas in the kitchen, one new recipe a week for a year. Unless we go on vacation. Or I’m sick. Or the kids are sick. Or I forget or we get bogged down in leftovers. I finally settled on an AVERAGE of one recipe per week. 52 recipes in 365 days. I originally thought I’d use Instagram to post shots of my dishes and use the caption for the family’s reviews. I’d even decided to tag them #fiftytwoin2017. For accountability, I shared my plan on Facebook. The response was encouraging but as friends started asking me to share the recipes, to get them out of their rotating menus and culinary comfort zones, it got bigger than Instagram and Facebook. I couldn’t bring myself to post a multi-paragraph status update, and certainly not a weekly one. This project needed its own space. So the blog, in it’s own way, made the cut this year.

15871689_10154975034694090_4822533122631135580_nHere’s a sneak peek.