
The first recipe of #fiftytwoin2017 hits many of the bullet points in my to-share list for this challenge: to try various global cuisines (pho is Vietnamese), include some gluten-free recipes (rice noodles), and to make use of different cooking methods and appliances – this one uses the PRESSURE COOKER.
The pressure cooker! The bazillion-in-one kitchen appliance you probably didn’t even know you needed! It sears, it steams, it makes rice, yogurt, and even hard-cooked eggs! The pot insert is dishwasher safe! Makes chicken stock in 45 minutes! Makes otherwise subdued writers break personal records for exclamation points in a single paragraph!
I’d been terrified of pressure cookers for a long time before finally coming around. I suspect an after school special is to blame (without after school specials, how are kids these days instilled with relevant yet slightly irrational fear?), and I am still a little freaked out by the stovetop models. So far my 6-quart InstaPot has proven itself safe, foolproof, and as easy to clean as it is to use. If you can drive a car (even poorly), you can handle an InstaPot. Like many things in a busy mom’s life, though, mine has been used regularly but not very creatively: yogurt, rice, eggs, repeat. I was so excited to find a pressure cooker recipe for one of my favorite dishes, I couldn’t not try it.
Written for a stovetop cooker (dun dun duuuunnnnn), this pho recipe is from the January 2017 issue of Sunset magazine. Sunset is a West Coast lifestyle magazine, and while we no longer live in the Puget Sound, the recipes are still delicious on the Chesapeake. If you don’t have a pressure cooker (explain yourself), this can be done in a stockpot (but will take FOREVER).
This recipe made large (I couldn’t finish mine) pho dinners for two adults with chicken and noodles for two soup-averse children (almost 7 and almost 5), PLUS enough leftovers for at least 4 normal sized bowls of pho. Second night dinner was at least as good as the first, possibly better.
The original recipe is here, where you’ll find the stovetop cooker and stock pot versions. My annotated version (notes in bold), including instructions for an electric pressure cooker, is here:
BROTH
- 1 whole chicken (4 lbs.) My chicken was closer to 5 lbs. No adjustments needed.
- 1 rounded tbsp. coriander seeds
- 3 whole cloves
- 1 medium yellow onion, peeled, halved, and sliced 1/2 in. thick
- 1 3-in. piece ginger, peeled and thickly sliced
- 1 small Fuji apple, peeled, cored, and cut into thumbnail-size chunks Thumbnail-size chunks? Just chop it up. It’s getting cooked to death anyway. And I have no idea what kind of apple I used. It was mostly red and probably a Gala or a Cripps Pink. Any sweet, firm-fleshed apple will do. Except Red Delicious, which have no purpose outside office break room fruit bowls and should be renamed Red Decorative or Red Disgusting.
- 3/4 cup coarsely chopped cilantro sprigs For this, don’t even bother removing the stems.
- About 2 1/4 tsp. fine sea salt I tried to go light on the salt for some virtuous reason and ended up adding the difference and then some in the end. 8 cups is a lot of water and it needs to be seasoned properly
- About 1 1/2 tbsp. fish sauce
- About 1 tsp. organic sugar* or 2 tsp. maple syrup, if needed to round out flavor I used turbinado sugar because I happened to have it. I wouldn’t go out and buy special sugar for this.
BOWLS
- 10 ounces dried narrow flat rice noodles I could only find 6.75 ounce packages, so I went ahead and cooked two. We will be eating rice noodles until the end of days. 6.75 ounces would have been MORE than enough for the 4 of us.
- About half of cooked chicken from the broth
- 1/2 small red onion, halved lengthwise, then thinly sliced and soaked in water 10 minutes This goes into the bowl raw. So if your family is super onion averse, save yourself the work.
- 1/4 cup thinly sliced green onion, green parts only
- 1/4 cup chopped fresh cilantro leaves
- Pepper totally optional
- VIETNAMESE HERB GARNISH PLATE
- VIETNAMESE GINGER DIPPING SAUCE Also optional.
First, make the broth. And IT KEEPS so you can do this hours or even a couple of days in advance. The essence of pho is the complex, delicate, flavorful broth that has to be just right. The pressure cooker makes this most important and complicated step so easy that boiling noodles right before serving is the most difficult part of the dish (we’ll get to that, it’s actually a bit of a process).
1. Make broth: Rinse chicken and set aside to drain. I do not rinse my chicken. If you cook it enough to kill the inside bacteria you’ll kill the outside bacteria as well. I’m more worried about raw chicken splashing and dripping all over my kitchen. (Feel free to imagine a raw chicken bathing like a toddler in my kitchen sink.)
Put coriander seeds and cloves in a dry 6- to 8-qt. pressure cooker. Over medium heat, toast until fragrant, shaking, several minutes. Add onion and ginger and cook, stirring, until browned on edges, 2 to 3 minutes. Use the “Saute” setting on the electric cooker for this. (One pot! Yes!) The ginger and onion will stick like crazy to the bottom, that’s the idea. Don’t panic.
“Traditionally, the ginger and onion would be charred directly on a burner. I’ve found that this is the best shortcut to get that flavor,” says Nguyen. Oh, that’s why we’re doing this. Cool, I love a good shortcut.
2. Add 4 cups water, then the chicken, breast side up. What I’d change next time: add ONE cup of water and scrape up all the brown tasty bits from the bottom, then add three more cups and the chicken.
Add apple, cilantro, salt, and another 4 cups water. “Having only half the water in the pot when the chicken goes in means you won’t splash yourself.” This seems silly unless you have ever (maybe many many times) splashed yourself with raw chicken water. (I never thought I’d write or even care so much about splashing raw chicken.)
Lock the lid in place.
3. Following your cooker’s instructions, bring to low pressure (8 psi) over high heat. Lower heat to maintain pressure. Cook 15 minutes, or a few minutes longer if your cooker’s low setting is less than 8 psi. If your cooker has only a high-pressure (15 psi) setting, cook 12 minutes.
For the electric models: Set the valve to Sealing and use the Manual setting to set the cooker for 15 minutes at low pressure. My pot with the 5 lb chicken took 35 minutes to come up to pressure before the cook cycle started. This isn’t an instant dish, but you don’t have to monitor it at all.

4. While broth cooks, soak noodles in hot tap water until pliable and opaque, about 10 minutes. Drain, rinse, and drain well. Divide among four large soup bowls. If you’re not doing this more than a couple hours in advance, don’t wait to do this. I made that mistake and things started to go a bit sideways at the end as I was trying to plate everything.
5. When broth is done, lift cooker to a cool burner and let pressure decrease until pressure indicator drops, about 20 minutes. Just let it depressurize on its own. At this point in my cooking I had to go get G from the bus stop so I can only tell you that depressurizing took somewhere between 7 and 25 minutes.
Remove lid.
6. Let cool 5 minutes, then use tongs to transfer chicken to a bowl. “Don’t worry if some parts fall off. Just add them to the bowl too.” I lost a wing in this step. I have nothing to add except be sure to tilt the chicken before completely removing it from the pot to pour out any liquid trapped in the cavity. Add cold water to cover, then soak 10 minutes to cool. Pour off water, partially cover chicken, and set aside to finish cooling.
7. With a shallow ladle, skim most of fat from broth. Strain broth through a muslin- or cheesecloth-lined strainer into a medium pot, pressing to expel as much broth as possible. I did not line my strainer with cheesecloth. If you have a fine mesh strainer you shouldn’t need to, either, but don’t skip on pressing the solids, it releases a surprising amount of liquid. Discard solids. If you’ve got the time, you can strain the broth and chill it, and the fat will solidify and you can remove it more easily. If you are eating this same day and only have one mesh strainer, WASH IT NOW.
Season broth with fish sauce, plus salt and sugar to taste. “Add fish sauce now, at the end. Otherwise you lose some of its umami oomph.” So if you strain and chill, wait to season until you’re reheating the broth to serve it.

8. To serve, bring broth to a simmer over medium heat. Fill a medium pot with water and bring to a rolling boil for noodles. Triple check your water burner and make sure it’s not set to medium low because water takes FOREVER to boil that way. Or so I’ve heard. Also make sure the pot is shallow and/or full enough that you can submerge your mesh strainer in it.
9. Meanwhile, prepare your pho assembly line: Slice breasts and legs from chicken; set aside half for another use. Yes! This recipe gives you a WHOLE EXTRA HALF CHICKEN. Enchiladas! Chicken Salad! Regular salad! Sandwiches! Eating out of the container over the sink after the gym (if you’re into that sort of thing)!
Cut or tear breast and leg meat into 1/4-in. slices or shreds (discard skin) and put in a bowl. Put red onion, green onion, cilantro, and pepper in separate small bowls. I lovingly sliced, soaked and then threw out the red onion.
Set out the bowls of soaked noodles.
10. The noodles were the most complicated part for me; everything happens rather quickly. I did my kids’ broth-less noodles first so they’d be cooler than lava by chow time. By washing your strainer in step 7, you’ve saved yourself from frantically scrubbing a strainer while you’ve got two hot pots on the stove.
When water is boiling, tip the first bowl’s noodles into a noodle strainer or other small mesh strainer. Dunk strainer into boiling water, stirring noodles with chopsticks or a fork to loosen them, until they’re soft, 20 to 40 seconds. “Lift one out and pinch it to see whether it’s tender. Some noodles are thicker and need more time.” Pull strainer of noodles from water, shaking to drain into pot, and empty into the soup bowl. Inexplicably, my thin noodles took FOREVER, maybe because my water wasn’t at a full rolling boil, but more of a moderate bubbly boil. Allow a little extra time for this step.
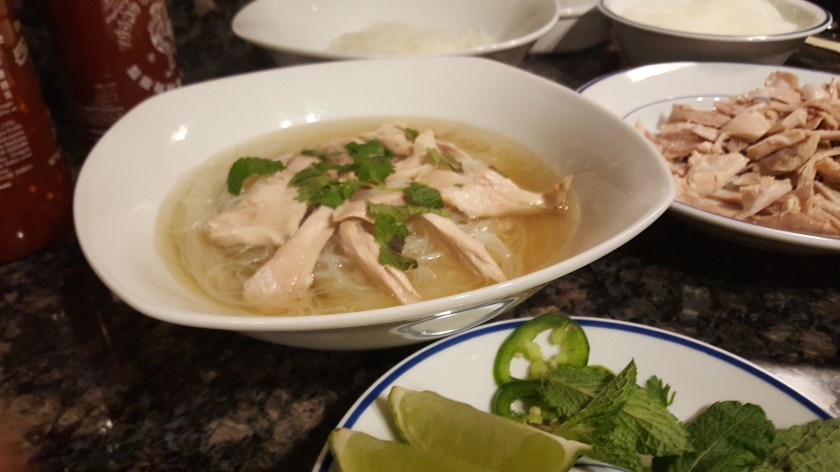
Top with chicken. “Arrange the chicken so it’s flat in the bowl. That way, it gets nicely heated by broth.” Add red onion, green onion, cilantro, and a sprinkle of pepper, to give it a little pop. I did not pop my broth with pepper. Oops.
11. Taste broth once more and season with fish sauce, salt, and/or sugar if needed. Divide among bowls. Serve immediately, with Garnish Plate and Ginger Dipping Sauce. I did a garnish plate with Cilantro, Mint, sliced jalapeños, green onions and lime wedges. I would have used basil if I had found any at the grocery. The recipe has bean sprouts on the garnish plate as well. I almost bought some but then remembered in the 10+ years I have been enjoying pho, I’ve never once added sprouts. I also had sriracha and chili garlic sauce on the table. If I were serving this to only adults on a weekend, I would love to try the dipping sauce recipe included with this. The chili garlic sauce was an acceptable stand in for the half of my family that goes for sauce of any kind, and the hardest part of it was peeling the inner seal off the jar.
12. The recipe doesn’t include this step, but ENJOY.

Omg. Love it. Love your line about Red Disgusting apples. Agree completely. Why do they even sell those anymore?!
LikeLiked by 1 person