Old Rag Pie

Happy Valentine’s Day, or, as we call it here, Violetine’s Day! Today is the arbitrary date we chose to be our rescue dog Violet’s birthday. She is four and, mercifully, starting to calm down.

Wombat and I don’t do Valentine’s Day. There are many reasons, most of them practical in nature (Try booking a restaurant and a sitter for tonight? No, thanks!), but our primary reason is this: we got engaged on February 9. We have our own holiday, we call it Us Day.

Yes, Us Day is sweet and special and not hyped by Big Greeting Card, but it’s not untouchable. In the past we’ve gone to fancy restaurants, done a weekend away, really put effort into making Us Day about, well, us. Of course we’ve also had years when Wombat was at sea or I was significantly pregnant (One year had both. Not my favorite), but this year was something truly special.

This year, on Us Day, Wombat took Peanut and Meatball on an overnight with Cub Scouts and I had the house to myself for 18 hours straight and it was everything I could dream of and more. No one asked me for a snack for a whole day. I was able to knit uninterrupted, take up the entire bed, and best of all, make something no one else likes for dinner and not hear a single complaint.

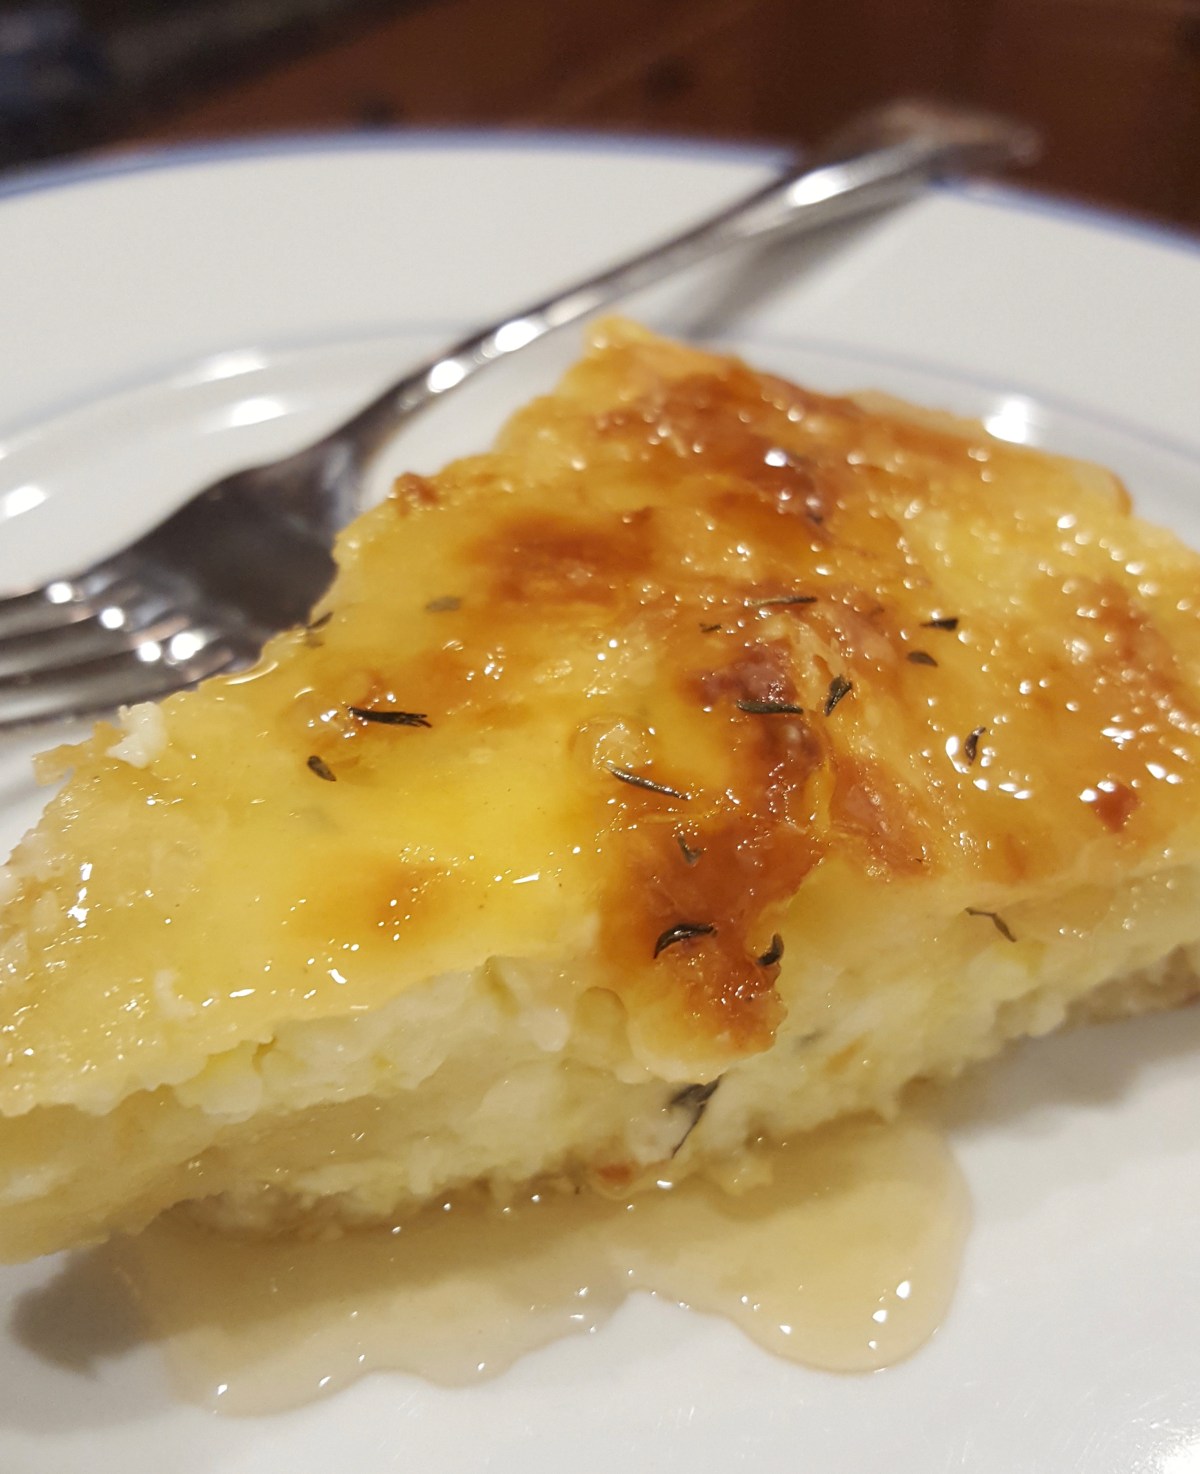
Old Rag Pie caught my eye the first time I leafed through Simply Nigella because it includes Feta cheese and honey, and I am a sucker for any sweet/savory combination. It’s filo pastry, cheese, and custard with herbs and honey and would be perfect if not for my family, who hate Feta (Wombat and Meatball) and/or eggs (Peanut). I had all but forgotten about it when it popped up as the recipe of the day on Nigella’s Instagram the very morning of Us Day. The only ingredient we didn’t already have on hand was Feta. Perfect. This recipe was dinner and breakfast for my period of solitude.

fullsizeoutput_2b5c

I made this cheese pie while enjoying other cheeses with wine because there is no such thing as too much cheese.

Old Rag Pie from Nigella’s Recipes, as always, my notes are in bold.

  • 7 tablespoons soft unsalted butter I used 8 because I’m apparently too lazy to cut a tablespoon off a stick of butter. 
  • 10 ounces frozen filo pastry (thawed) I used 8 ounces because my one pound box of frozen phyllo was divided into two individually wrapped rolls and see above.
  • 8 ounces feta cheese No change, my feta arrived at this weight (yay!).
  • 2 teaspoons grated parmesan
  • 2 teaspoons leaves from fresh thyme (or 1 teaspoon dried) I used dried and totally winged it on quantity. I measured in “sprinkles”.
  • 2 large eggs
  • ⅔ cup whole milk
  • 1 tablespoon sesame seeds I did not have these, nor did I miss them.
  • 1 jar of good honey (such as Greek thyme honey or orange blossom honey) A couple things about the honey: first, the jar is for serving with the pie; I freaked out about how much honey is “1 jar” for too long before reading the whole recipe. Second, use GOOD honey. I used wildflower honey that my mom orders from some place in a state where neither of us lives. Find a quality honey, local if possible. Something with a complex flavor, not that clover stuff from the grocery. I realize I sound like a honey snob but because you pour it on at the end, it really does make a difference.  


    You will need 1 x 20cm/8-inch square cake tin (preferably non-stick). I used a 9 inch round because I don’t have a square nonstick and I hate scrubbing. I also lined it with parchment. 

    1. Melt the butter in a small saucepan, then take it off the heat.
    2. Line your cake tin with a layer of filo, making sure it comes up the sides; you will need to use more than one sheet. Then pour 1 tablespoon of melted butter over the pastry.
    3. Using one third of the remaining filo sheets, tear and scrunch the sheets up and drop them loosely in the tin. Then crumble in half the feta, sprinkle with 1 teaspoon of Parmesan and just under ½ teaspoon of thyme leaves (or ¼ teaspoon of dried thyme) and pour a third of the remaining melted butter over the top. My filo hadn’t quite thawed so it mostly crumbled. My final product was perhaps a bit dense because of this but I’m not complaining. Turns out, I’m more impatient than I am a perfectionist. 
    4. Repeat, so that you use up all but a little of the butter and a small amount of thyme. For the last layer, you can use larger pieces of filo “rags” (as it’s the lid), filling the tin a little more tightly, but still scrunching them.
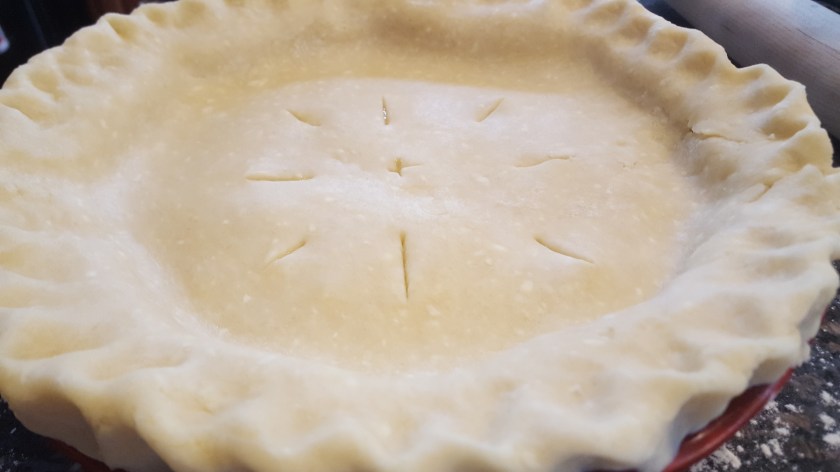
    5. Fold the edges of overhanging filo over themselves, and pour the remaining butter on top. Using the sharp point of a knife, make 2 cuts down and 2 cuts across into the filo-packed tin, from edge to edge to create 9 sections. I cut my round tin into 8 wedges. It’s important that you don’t use a blunt knife, as you don’t want to drag the filo or press down on it. This whole process went poorly for me. I don’t know if it was my pan or the knife or my frozen filo, but in the end I decided to perforate the pie rather than slice it, which worked well.
    6. Beat the eggs with the milk, then pour over the contents of the tin. Sprinkle the last bit of thyme along with the sesame seeds on top. Let it stand for at least 30 minutes in a cool place before baking. If 2 hours is easier for your timetable, then put it in the fridge. And you can do this in advance (see Note).
    7. Heat the oven to 200°C/180°C Fan/gas mark 6/400°F, and bake the pie for 30 minutes. When it’s ready, the pastry will be golden and puffed up, and the inside set.
    8. Let it stand for 10 minutes, then spoon 1 tablespoon of the honey over the top. AT LEAST 1 tablespoon. I went for broke with the honey and have no regrets.
    9. Cut into slices or slabs – using a serrated bread knife and sawing action to prevent squishing the filo on top too much, then pushing the knife down to cut through. Serve the pie directly from the tin and put the jar of honey, with a spoon in it (or you can pour it into a jug) on the table for people to add extra as they eat. The parchment enabled me to slide the whole thing out of the pan and slice it on a cutting board, which was much easier on both me and the pan. And always yes to extra honey.

The recipe site includes directions for making ahead and chilling/freezing before baking, which would make this a great dish for entertaining. It also reheats very well. You may be tempted to eat any leftovers cold the next day, but reheating in a 350 oven for 5 minutes (for one slice, the website says 300 for 15 for more) is more than worth the time.


10/52 Ohio Lemon Pi(e)

fullsizeoutput_2b323.14 (159…) is significant when you are a proud member of the geek tribe and married to their king. When I told Wombat I was making a pie for Pi Day, March 14 (yesterday), he asked me what time? The correct answer is 1:59. Because geometry.

Finding a new recipe for Pi Day was a challenge because I’ve made a few pies in my day. Every Thanksgiving I make a pumpkin pie (Wombat’s favorite – I think I have 3 different pumpkin pies in my repertoire now) and then in years when we’ve had many guests (our record is 22), I’ve made a second pie, and I never repeat a second pie. We’ve had chocolate cream, chocolate espresso pecan, apple cider cream, classic apple, Marcus Samuelsson’s Black-Bottom Peanut Pie (OMG), buttermilk chess pie, and I think lemon meringue one year. In season, I like to make blueberry pie or pre-make the filling to enjoy when blueberries aren’t as plentiful, but March is not a great time to find seasonal fruit. I went to an old standby, The Joy of Cooking (Wombat calls it The Tome), looking for inspiration. The Ohio Lemon Pie jumped out at me, primarily because the first 24 of my undisclosed number of years on this earth were spent in Ohio and I had NEVER heard of it. The reason became clear: without a mandolin slicer and a food processor, this pie would be prohibitively labor intensive. I did not own either of these things until well into my 27th year, so, boom.

This pie is intensely lemony. Like lemon drop candy plus lemon marmalade plus lemon curd with lemon juice and limoncello lemony. I used a standby butter pastry crust and the rich flavor and flaky texture really contrast the dense, tart, lemoniness of the filling. No whipped cream, ice cream, or other accoutrements are necessary. The filling contains sliced whole lemons, peel, pith, and all, and I must admit the “no waste” idea appealed to me. What surprised me was that the pith, which I expected to be tough and bitter, wasn’t unpleasant, as it softened nicely after 24 hours of macerating in sugar and the lemons’ own juice. The membrane between the segments, however, remained as tough as ever, was nearly impossible to slice through, and made for some messy plates. Making this again, I would slice and macerate the lemons per the recipe, then spin the whole lot in the food processor to break up the membrane a bit. I’m curious to try this modified method with other citrus fruits, maybe a lemon-orange combination, lime, or even pink grapefruit. I did not use the crust recipe from Joy, but am excited that this pie gives me an opportunity to share the best crust recipe I’ve ever used and the only one I ever will use again.

5 thumbs up for this one. The boys liked the crust (little butter fiends) so one up from each of them, but I think the texture of the filling threw them both a bit, and it was too tart and lemony for Peanut (Meatball eats lemons straight, so no tartness issues with him). Wombat gave it two thumbs up, and it gets one from me, primarily because the original method made plating it a huge pain and eating it a minor one.

fullsizeoutput_2b38
Not pretty. Good thing I’m not superficial. 

The flavor, however, was unique and delicious and maybe I had two slices for second breakfast this morning. I taught a class at the gym last evening and I get pre-class jitters, so I didn’t eat much yesterday. This means that today (and any day after I teach a later class), I pretty much rummage mouth-first through the kitchen like a shark-raccoon. Fortunately for my waistline and blood sugar, we don’t always have fresh pie sitting around. The recipe says to bring it to room temperature before serving and/or eating, but I prefer it cold, or maybe I’m just impatient.

Ohio Lemon Pie (Recipe abridged from The Joy of Cooking, my notations in bold)

Prepare:

Flaky Pastry Dough or Deluxe Butter Flaky Pastry Dough See the end of the recipe for the best pie dough recipe ever ever. 

Roll half the dough into a 13-inch round, fit it into a 9-inch pie pan and trim the overhanging dough to 3/4 inch all around. Refrigerate. Roll the other half into a 12-inch round for the tip crust and refrigerate it. I don’t know what your fridge situation is like but I do not have this kind of real estate for storing flat, delicate dough. I made the crust the day (almost the moment) I baked the pie. Grate the zest from:

2 large or medium lemons My lemons were medium and I totally spaced on this step, so the zest just went in still attached to the lemon.

Slice the lemons paper thin, removing the seeds as you do so. Mine were more manila-folder thin, maybe even cereal box cardboard thin. In a glass or stainless-steel bowl or ceramic or plastic, just don’t use anything that will corrode because lemons are crazy acidic combine the lemon slices and grated zest (or not) with:

fullsizeoutput_2b33
Before macerating
  • 2 cups sugar
  • 1/4 tsp salt
fullsizeoutput_2b35
24 hours later

Cover and stand at room temperature for 2-24 hours, stirring occasionally. The longer the lemons macerate, the better. I gave mine the full 24 hours and stirred them maybe 4 or 5 times. Stirring is a great time to catch and remove any seeds missed during slicing.

I started my crust a couple of hours before I was ready to bake. Okay, I started the crust about an hour before I had to pickup Meatball from preschool and then rolled out and chilled the bottom crust before moving on to this step: Position a rack in the lower third of the oven. Preheat the oven to 425. Whisk until frothy:

  • 4 large eggs

Whisk in:

  • 4 Tbsp butter, melted
  • 3 Tbsp all-purpose flour

If you plan to process the lemon mixture, do it now. Stir the lemon mixture into the egg mixture. It took quite a bit of stirring to make sure the slices and sugar were evenly distributed. Pour the filling into the bottom crust and level with the back of a spoon. Brush the overhanging crust with cold water. Cover with the top crust, trim (didn’t trim, I like a big crust and more importantly so do the boys) and crimp or flute the edge I use the (very clean) knuckles of my index fingers to flute the edge. 20170314_124408
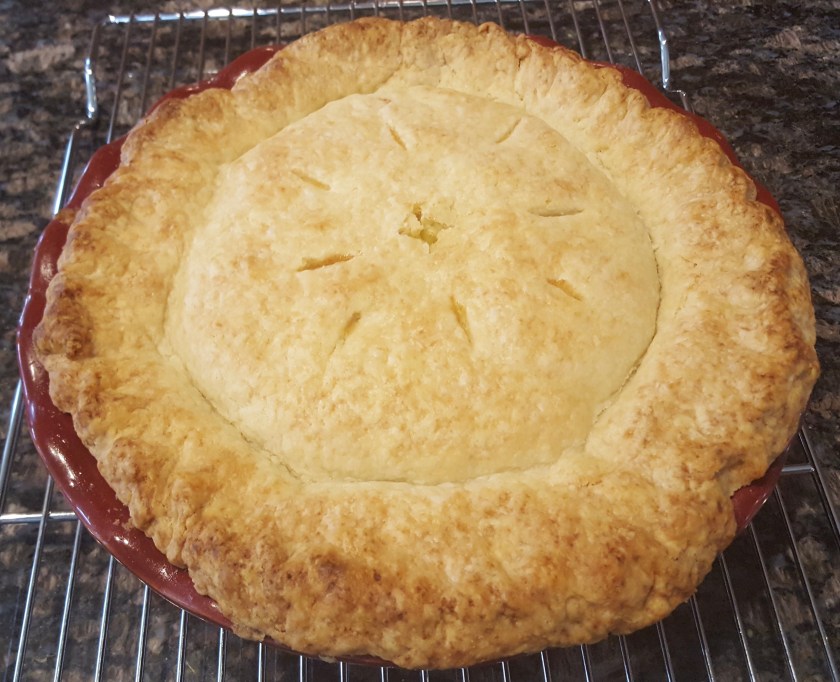
Cut steam vents in the top crust (evenly distributed and other than that it doesn’t matter where. I put one in the middle because I knew I’d have to test doneness there) and bake for 30 minutes. Reduce the oven temperature to 350 and bake until a knife inserted in the center comes out clean, 20-30 minutes more . Mine took the full 30. Let cool completely on a rack.

fullsizeoutput_2b37
Can you imagine trimming (and trashing) any of that gorgeous buttery crust?

If you have a lab-type dog, secure the pie in the microwave or elsewhere out of reach. The pie can be stored in the refrigerator for up to 2 days but let it warm to room temperature before serving. Or don’t.

Foolproof Double-Crust Pie Dough (From Cook’s Illustrated The Science of Good Cooking)

I keep a bottle of vodka in my freezer exclusively for pie crust. Here’s a quick shakedown of the science behind it. Gluten gives baked goods structure. In pizza crust, this quality of chewiness is desirable but it makes cakes and pie crusts tough, not tender. Gluten needs water to develop. Minimizing water helps to reduce gluten development, but a dry dough can be impossible to manipulate. Vodka provides moisture for handling but minimal water, so gluten doesn’t form as readily, and the alcohol cooks off without contributing any flavor whatsoever. I assume this is also why the recipe includes shortening, which contains no water, whereas butter is 16-17% water.

The recipe cautions (and I concur) that this can not be successfully made without a food processor.

Halving this recipe will make a single pie shell.

20170314_123928
Move the crust from the counter by rolling it gently around the rolling pin, then unroll it right into the pan.
  • 2 1/2 cups all-purpose flour
  • 2 tablespoons sugar
  • 1 teaspoon salt
  • 12 tablespoons unsalted butter, cut into 1/4 inch pieces and chilled
  • 8 tablespoons vegetable shortening, cut into 4 pieces
  • 1/4 cup vodka, chilled
  • 1/4 cup ice water
  1. Process 1 1/2 cups flour, sugar, and salt together in food processor until combined, about 5 seconds. Scatter butter and shortening over top and continue to process until incorporated and mixture begins to form uneven clumps with no remaining floury bits, about 15 seconds.
  2. Scrape down bowl and redistribute dough evenly around processor blade. Sprinkle remaining 1 cup flour per dough and pulse until mixture has broken up into pieces and is evenly distributed around bowl, 4 to 6 pulses. The dough will look like wet playground sand. There will be larger clumps, smaller clumps, and tiny bits. Don’t over process it!
  3. Transfer mixture to a large bowl. Sprinkle vodka and ice water over mixture. I hold back some of the water in this step and usually don’t need all of it. For this pie I had a tablespoon leftover. Stir and press the dough together, using stiff rubber spatula, until dough sticks together.
  4. Divide dough into to even pieces. Turn each piece of dough onto a sheet of plastic wrap and flatten into a 4-inch disk. Wrap tightly and refrigerate for 1 hour. Before rolling out, let it sit on the counter to soften slightly, about 10 minutes. (Dough can be wrapped tightly in plastic and refrigerated for up to two days or frozen for up to one month. Thaw completely before rolling out.) For holidays when I know I’ll be busy as heck in the kitchen, I always make pie crusts in advance.